
Applying a Patch
MapR patches are version-specific and cumulative. Each patch contains the code fixes that were included in the previous patch for that MapR version.
MapR version-specific patches are available here: http://package.mapr.com/patches/releases/
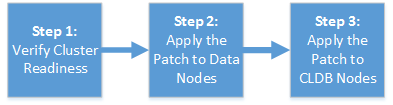
Applying a patch is a 3 step process:
When you apply a patch to the cluster, the patched files along with original files
(non-patched) are copied to the /opt/mapr/.patch folder. In the /opt/mapr/.patch folder, the
file ending with .O is the original file (non-patched) and the file ending with
.<patch_number> is the patched version. Therefore, if there is a file under
/opt/mapr/.patch/lib/, you can compare that with the corresponding file under /opt/mapr/lib/
by using the md5sum command to verify that the patch was successfully
deployed.
- Go to the MapR Customer Support web portal at www.mapr.com/support. After logging into the portal, click the "Patches" tab and choose the appropriate MapR version to view the list of bug fixes. You will then see the patch name for the fixes displayed.
- View a copy of the latest Patch Release Notes.
Contact support@mapr.com if you need more information or if you face any problems with patch installation.